شرح عمل ModelClass و Constructor لبيانات الlistView في Flutter
دالة البناء والمعروف باسم Constructor من الدوال التي لا غنى عنها تماما في اي مجال برمجي سواء كان مجالك تطوير تطبيقات اندرويد و ios او غيرها فهذة الدالة عليك معرفتها ومعرفة الخواص التي تقدمها وهي بكل بساطة تسمح لك بكتابة البيانات التي ترغب بها وتمريرها في متغيرات الget و set واعتقد كل مبرمج يعرف اهمية هذة الدوال وما الفائدة منها .
تقنية flutter واحده من التقنيات الحديثة التي احدثت ضجة كبيره في مجال ال software بسبب دعمها لاكثر من platform بكود واحد وأصبح الاقبال عليها كبير جدا ومازال العدد في زيادة وفي طبيعة الحال لابد لنا من تقديم كل جديد في مجال البرمجيات لكم بشكل مجاني بالكامل و هذا ما نسعى له وهو توفير كل ما يحتاجه المبرمجه بالمجان لكي يتمكن من تصميم وبرمجة تطبيقاته .
تعد تقنية flutter والتي تعمل بلغة Dart التي ظهرت في عام 2011 ولكن لم يكن الاقبال عليها كبير الا من بعد ظهور فلاتر في أواخر سنة ٢٠١٧ وكانت جوجل تسعى وقتها لتوحيد لغة برمجية واحده تمكن المطور من انشاء واخراج تطببق android , ios بكود واحد فقط دون الحاجه الى كتابة اكثر من كود وتعلم اكثر لغة برمجة من اجل تطوير وتصدير التطبيق .
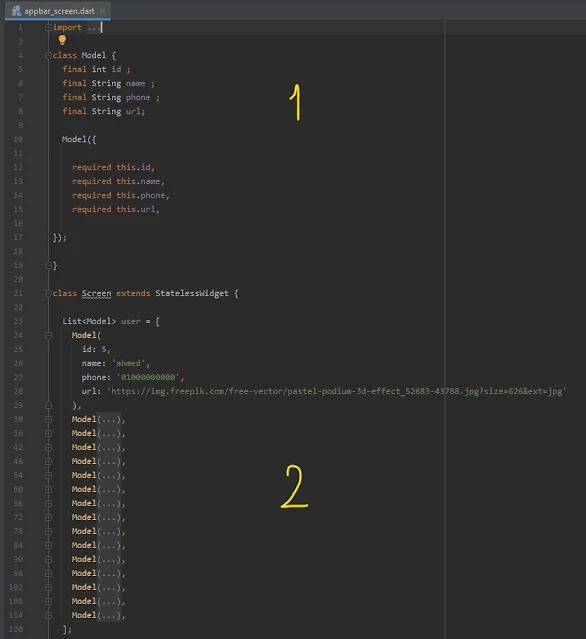
عمل class يحتوي على البيانات التي نريد تمريرها وعمل لها Constructor
ببساطة يمكنك انشاء ملف دارت وعمل بداخلة كلاس يحتوي على البيانات او يمكنك عزيري عمل الكلاس داخل ملف الدارات الذي تعمل عليه كما يظهر معك بالصورة والكود التالي , سوف نقوم بعمل id واسم ورقم هاتف ورابط للصورة وهذة البيانات سوف نجعلها required لكي يتمكن المستخدم من ادخالها , والان داخل الكلاس الاساسي قم بإستدعاء list تحتوي على Model الذي قمت بعمل بيانات بداخله وقم بتمرير البيانات التي ترغب بها كما يظهر بالصورة قمنا بتمرير البيانات اكثر من مره , وكل مره تحتوي على بيانات مختلفة .
Screen.dart
class Model {

  final int id ;
  final String name ;
 final String phone ;
  final String url;

  Model({

    required this.id,
    required this.name,
    required this.phone,
    required this.url,

});

}


class Screen extends StatelessWidget {


  List<Model> user = [

    Model(
      id: 5,
      name: 'ahmed',
      phone: '01000000000',
      url: 'https://img.freepik.com/free-vector/pastel-podium-3d-effect_52683-43788.jpg?size=626&ext=jpg'
    ),

    Model(
      id: 8,
      name: 'mohamed',
      phone: '01000000000',
      url: 'https://i.pinimg.com/736x/29/cd/3c/29cd3caa4cad15e6a4203e886039e85e.jpg'
    ),

    Model(

        id: 5,

        name: 'maher',

        phone: '010003500000',

      url: 'https://mir-s3-cdn-cf.behance.net/project_modules/max_1200/6add1393834339.5e6f52ba06ab5.jpg',

    ),

    Model(

        id: 13,

        name: 'shrouck',

        phone: '01000000800',

      url: 'https://i.pinimg.com/originals/72/87/aa/7287aa92994693a8af8812bd7ccc4090.png',

    ),

    Model(

        id: 55,

        name: 'khaled',

        phone: '01000980000',

      url: 'https://image.freepik.com/free-photo/3d-illustration-smartphone-with-store-screen-with-gift-boxes-side_58466-14580.jpg'

    ),

    Model(

        id: 80,

        name: 'omer',

        phone: '01009900000',

      url: 'https://socialspecialists.co.za/wp-content/uploads/2021/08/social-media-instagram-digital-marketing-concept-3d-rendering_106244-1717.jpg',

    ),

    Model(

        id: 83,

        name: 'yaser',

        phone: '0106996000000',

      url: 'https://cdn.dribbble.com/users/268847/screenshots/14205173/social_4x.jpg'

    ),

    Model(

        id: 32,

        name: 'nada',

        phone: '01075000000',

        url: 'https://cdn.dribbble.com/users/268847/screenshots/14205173/social_4x.jpg'

    ),

    Model(

        id: 56,

        name: 'esraa',

        phone: '01000036000',

        url: 'https://cdn.dribbble.com/users/268847/screenshots/14205173/social_4x.jpg'

    ),

    Model(

        id: 93,

        name: 'mona',

        phone: '01000007700',

        url: 'https://cdn.dribbble.com/users/268847/screenshots/14205173/social_4x.jpg'

    ),

    Model(

        id: 26,

        name: 'omnia',

        phone: '01000007500',

        url: 'https://cdn.dribbble.com/users/268847/screenshots/14205173/social_4x.jpg'

    ),

    Model(

        id: 38,

        name: 'eslam',

        phone: '01048600000',

        url: 'https://cdn.dribbble.com/users/13754/screenshots/10755240/media/c7b379724eb61a95018287e21f287b5e.png?compress=1&resize=400x300'

    ),

    Model(

        id: 146,

        name: 'aya',

        phone: '01009900000',

        url: 'https://cdn.dribbble.com/users/268847/screenshots/14205173/social_4x.jpg'

    ),

    Model(

        id: 74,

        name: 'naser',

        phone: '01000036000',

        url: 'https://cdn.dribbble.com/users/268847/screenshots/14205173/social_4x.jpg'

    ),

    Model(

        id: 5,

        name: 'fatma',

        phone: '01000000340',

        url: 'https://cdn.dribbble.com/users/268847/screenshots/14205173/social_4x.jpg'

    ),

    Model(
        id: 46,
        name: 'gehan',
        phone: '01009600000',
        url: 'https://cdn.dribbble.com/users/268847/screenshots/14205173/social_4x.jpg'
    ),
  ];
التعامل مع listview و scaffold
سوف تحتاج الى المتغير الذي يحمل البيانات وتستدعي منه البيانات , كما يظهر بالصورة في رقم 3 , رقم 4 والاخير وهو جعل القائمة بعدد العناصر الموجوده داخل list التي قمت بإنشائها , وجعل العناصر التي تظهر تكون من داخل Index الخاص بالlist التي قمت بعلمها بالاعلى .
  @override
  Widget build(BuildContext context) {
    return Scaffold(
      backgroundColor: Colors.grey[900],
        appBar: AppBar(
          elevation: 0.0,
          backgroundColor: Colors.grey[900],
          title:
          Row(
            children: [
              CircleAvatar(
                radius: 20,
               backgroundImage:NetworkImage('https://cdn.dribbble.com/users/13754/screenshots/10514046/media/75036ca28a43caf66b984a250bd1b39b.png?compress=1&resize=400x300'),
                // backgroundImage: NetworkImage(''),
              ),
              SizedBox(width: 13,),
              Text("Chat" , style: TextStyle(fontSize: 18 , color: Colors.white),),
            ],
          ),
          actions: [
            IconButton(onPressed: (){},
                icon: CircleAvatar(
                    radius: 17,
                    backgroundColor: Colors.black,
                    child: Icon(Icons.camera_alt, color: Colors.white, size: 16,),
                )),
            IconButton(onPressed: (){},
                icon: CircleAvatar(
                    radius: 17,
                    backgroundColor: Colors.black,
                    child: Icon(Icons.edit, color: Colors.white, size: 16,),
                )),
          ],
        ),
      body:
      Padding(
        padding: const EdgeInsets.all(15.0),
        // scroll horizontal
        child: SingleChildScrollView(
          child: Column(
            children: [
              SizedBox(height: 10,),
              Container(
                padding: EdgeInsets.all(8),
               decoration: BoxDecoration(borderRadius: BorderRadius.circular(15) , color: Colors.grey[700]),
               child: Row(
                  children: [
                    Icon(Icons.search),
                    Text("search",)
                  ],
                ),
              ),
              Container(
                // Change the height until the problem is solved
                height: 140,
                child: ListView.separated(
                    scrollDirection: Axis.horizontal,
                    itemBuilder: (context , index) => buildStory(),
                    separatorBuilder: (context , index) => SizedBox(width: 15,),
                    itemCount: 12),
              ),
              ListView.separated(
                // scroll up & down
                  shrinkWrap: true,
                  // stop scroll
                  physics: NeverScrollableScrollPhysics(),
                 itemBuilder: (context , index) => buildChat(user[index]) , separatorBuilder: (context , index) => SizedBox(height: 10,), itemCount: user.length),
            ],
          ),
        ),

      ),
    );
  }

  Widget buildChat(Model user) => Row (
    children: [
      Stack(
        alignment: AlignmentDirectional.bottomEnd,
        children: [
          CircleAvatar(
            radius: 35,
            backgroundImage: NetworkImage('${user.url}'),
          ),
          CircleAvatar(radius: 8, backgroundColor: Colors.green,),

        ],
      ),
      SizedBox(width: 12,),
      Expanded(
        child: Column(
          crossAxisAlignment: CrossAxisAlignment.start,
          children: [
           Text("${user.name}" ,maxLines: 1 , overflow: TextOverflow.ellipsis ,style: TextStyle(color: Colors.white , fontWeight: FontWeight.w700 , fontSize: 18),),
            SizedBox(height: 5,),
           Text("${user.phone}" ,maxLines: 2 , overflow: TextOverflow.ellipsis, style: TextStyle(color: Colors.white , fontWeight: FontWeight.w400 , fontSize: 11),),
          ],
        ),
      ),
      CircleAvatar(
        radius: 4,
        backgroundColor: Colors.blueAccent,
      ),
      SizedBox(width: 5,),
      Padding(
        padding: const EdgeInsetsDirectional.only(end: 5.0),
        child: Text("${user.id}", style: TextStyle(color: Colors.white , fontSize: 12),),
      ),
    ],
  );

  Widget buildStory () => Container(
    width: 60,
    padding: EdgeInsets.symmetric(vertical: 15),
    child: Column(
      children: [
        Stack(
          alignment: AlignmentDirectional.bottomEnd ,
          children: [
            CircleAvatar(
              radius: 30,
             backgroundImage: NetworkImage('https://images.milledcdn.com/2020-09-07/7K4PQLg4D1D_kROF/9Pvr832Ur5nk.png'),
            ),
            CircleAvatar(
              radius: 8,
              backgroundColor: Colors.grey[900],
            ),
            CircleAvatar(
              radius: 7,
              backgroundColor: Colors.red[300],
            ),
          ],
        ),
        SizedBox(height: 5,),
        Container(
            padding: EdgeInsetsDirectional.only(start: 5),
            child: Text("ahmed mahmoud" ,style: TextStyle(color: Colors.white) , maxLines: 2 , overflow: TextOverflow.ellipsis, )),

      ],
    ),
  );
}
اذا كان شغفك تعلم مهارة فلاتر في تطوير تطبيقات الاندرويد فالامر ما زال امامك والفرصه بين يديك حيث يقدم موقعنا العديد من الاكواد البرمجية في هذا المجال ومجالات اخرى عليك الاطلاع عليها والتعامل معها لفهمها بشكل اكبر وبصورة افضل والتعلم وإنشاء تطبيقاتك .
لمزيد من الاكواد يمكنك متابعة التالي
تصميم واجهة تطبيق messanger facebook بإستخدام flutter
تصميم واجهة Login في Flutter مع شرح كيفية التصميم
ازالة علامة debugging من التطبيق في Flutter
شرح كيفية تثبيت فلاتر flutter على اندرويد ستوديو بالصور خطوه بخطوه
android sdk manager تحميل flutter developers applications create app android android studio mac


