انشاء Dialog Fragment واستدعاءة في activity او fragment على شكل dialog
في كثير من الاحيان وانت تعمل تحتاج الى انشاء دايلوج وهذا امر طبيعي جدا والكل يحتاج اليه اثناء عمله وفي طبيعة الحال تلجأ الى الطريقة السابقة والتي قمنا بشرحها لكم وهي عمل dialog بشكل عادي عن طريق الكود ما يعيب هذة الطريقة تون غير تنظميه بمعنى انك تكتب الكود ولا تعرف ماذا يحدث بالتفصيل اثناء العمل الا عندما تقوم بعمل run لل app وتشاهد النتيجة وايضا الامر لا يقتصر على هذا فقط بل تحتاج الى كتابة كود اكبر اذا كنت تريد التعديل على الشكل الخاص به , في المقابل يوجد طريقة Dialog Fragment وهي تصميم xml تقوم بتحويله الى dialog .
أصبح الاقبال على ظيفة android developer كبير جدا في هذه الايام وذلك لان مجال ال developing اصبح مطور بكثره في مختلف الدول سواء العربيه او الاجنبيه وليس فقط android developer بل هناك ios developer وهو الشخص المتخصص في تطوير تطبيقات نظام ios الخاص بشركة apple وفي الغالب يكون راتب الios developer اكبر في بعض الاحيان وذلك بسبب قلة المبرمجين في نظام ios واصبحت الكثير من القنوات والمواقع على منصة YouTube تختص بشروحات ios وايضا android ويعد موقعنا واحد من اكبر المواقع المختصه في هذا المجال ومساعدة المبرمجين في التعلم .
اثناء تعلمك للdevelopment يفضل ان يكون لديك ورقه وقلم لتدوين كل ما تحتاجه وتتعلمه ولكن نحن في موقعنا نقوم بتوفير لك كل ما تريد دون الحاجه الى الورقه والقلم فقط كل ما تحتاجه هو التطبيق على الدروس التي نضعها وحسب لكي تفهم كيف يعمل الكود وايضا تكتسب خبره من كثرة كتابة الcode, ودائما حاول ان تعتمد بشكل كبير على انماط التصميم في البرجخ مثل mvvm وهو اشهر نمط حاليا والكثير من الشركات تطلبه ولك لاهميته التنظميه في كتابة الكود مما يجعل من اي شخص اخر قادر على التعديل على الكود الخاص بك ويعرف كل شخص عمله ui , back , developer يكون كل شخص قادر على معرفة وظيفته بالتحديد
انشاء وتصميم Custom Dialog في xml
قم بإنشاء blank fragment وبعدها افتح صفجة xml الخاص به وقم بتصميم الشكل الذي ترغب به وهنا قمت بتصميم شكل لfillter اريد استدعاءه في مكان اخر لذلك قمت بكتابة الكود الخاص به بشكل عادي دون اي اختلاف عن غيره من الاكواد وكما ترون ظهر الشكل كما قمت بتصميمه , هذة الطريقة توفير الكثير من الوقت عليكم اثناء عملية التطوير بدلا من الطريقة الاخرى التقليدي والتي تحتاج منك الى كود كبير وفي المقابل قد لا تصل الى الشكل الذي ترغب به في النهاية .
xml design
<?xml version="1.0" encoding="utf-8"?>

<androidx.cardview.widget.CardView

    app:cardCornerRadius="@dimen/_6sdp"

    xmlns:android="http://schemas.android.com/apk/res/android"

    xmlns:tools="http://schemas.android.com/tools"

    android:layout_width="@dimen/_190sdp"

    android:layout_height="wrap_content"

    android:layout_gravity="center"

    xmlns:app="http://schemas.android.com/apk/res-auto"

    tools:context=".Dialog_Fragment">


    <androidx.constraintlayout.widget.ConstraintLayout

        app:layout_constraintTop_toTopOf="parent"

        app:layout_constraintEnd_toEndOf="parent"

        app:layout_constraintBottom_toBottomOf="parent"

        app:layout_constraintStart_toStartOf="parent"

        android:layout_gravity="center"

        android:padding="@dimen/_12sdp"

        android:layout_width="@dimen/_190sdp"

        android:layout_height="wrap_content" >


    <TextView

        android:id="@+id/tv_View"

        android:text="View"

        android:textSize="@dimen/_15ssp"

        app:layout_constraintStart_toStartOf="parent"

        app:layout_constraintTop_toTopOf="parent"

        android:textColor="@color/singup"

        android:layout_width="wrap_content"

        android:layout_height="wrap_content" />


    <TextView

        android:id="@+id/thumbnails"

        android:text="Thumbnails"

        android:textSize="@dimen/_14ssp"

        android:textColor="@color/singup_opicity"

        app:layout_constraintTop_toTopOf="parent"

        android:layout_marginEnd="@dimen/_5sdp"

        app:layout_constraintEnd_toStartOf="@id/img_see"

        android:layout_width="wrap_content"

        android:layout_height="wrap_content" />


    <ImageView

        android:id="@+id/img_see"

        android:layout_width="@dimen/_15sdp"

        android:layout_height="@dimen/_17sdp"

        android:src="@drawable/more_small"

        app:layout_constraintEnd_toEndOf="parent"

        app:layout_constraintTop_toTopOf="parent" />


    <TextView

        android:id="@+id/tv_category"

        android:text="Category"

        android:textSize="@dimen/_15ssp"

        app:layout_constraintStart_toStartOf="parent"

        app:layout_constraintTop_toBottomOf="@id/tv_View"

        android:textColor="@color/singup"

        android:layout_width="wrap_content"

        android:layout_height="wrap_content" />


    <TextView

        android:id="@+id/category_change"

        android:text="Men’s Apparel"

        android:textSize="@dimen/_14ssp"

        android:layout_marginTop="@dimen/_3sdp"

        android:textColor="@color/singup_opicity"

        app:layout_constraintTop_toBottomOf="@id/thumbnails"

        android:layout_marginEnd="@dimen/_5sdp"

        app:layout_constraintEnd_toStartOf="@id/img_see"

        android:layout_width="wrap_content"

        android:layout_height="wrap_content" />


    <ImageView

        android:id="@+id/img_see2"

        android:layout_width="@dimen/_15sdp"

        android:layout_height="@dimen/_17sdp"

        android:src="@drawable/more_small"

        android:layout_marginTop="@dimen/_5sdp"

        app:layout_constraintEnd_toEndOf="parent"

        app:layout_constraintTop_toBottomOf="@id/img_see" />


    <TextView

        android:id="@+id/tv_condition"

        android:text="Condition"

        android:textSize="@dimen/_15ssp"

        app:layout_constraintStart_toStartOf="parent"

        app:layout_constraintTop_toBottomOf="@id/tv_category"

        android:textColor="@color/singup"

        android:layout_width="wrap_content"

        android:layout_height="wrap_content" />


    <TextView

        android:id="@+id/condition_change"

        android:text="Brand New"

        android:textSize="@dimen/_14ssp"

        android:layout_marginTop="@dimen/_3sdp"

        android:textColor="@color/singup_opicity"

        app:layout_constraintTop_toBottomOf="@id/category_change"

        android:layout_marginEnd="@dimen/_5sdp"

        app:layout_constraintEnd_toStartOf="@id/img_see"

        android:layout_width="wrap_content"

        android:layout_height="wrap_content" />


    <ImageView

        android:id="@+id/img_see3"

        android:layout_width="@dimen/_15sdp"

        android:layout_height="@dimen/_17sdp"

        android:src="@drawable/more_small"

        android:layout_marginTop="@dimen/_5sdp"

        app:layout_constraintEnd_toEndOf="parent"

        app:layout_constraintTop_toBottomOf="@id/img_see2" />


    <TextView

        android:id="@+id/tv_material"

        android:text="Material"

        android:textSize="@dimen/_15ssp"

        app:layout_constraintStart_toStartOf="parent"

        app:layout_constraintTop_toBottomOf="@id/tv_condition"

        android:textColor="@color/singup"

        android:layout_width="wrap_content"

        android:layout_height="wrap_content" />


    <TextView

        android:id="@+id/material_chane"

        android:text="Cotton"

        android:textSize="@dimen/_14ssp"

        android:layout_marginTop="@dimen/_3sdp"

        android:textColor="@color/singup_opicity"

        app:layout_constraintTop_toBottomOf="@id/condition_change"

        android:layout_marginEnd="@dimen/_5sdp"

        app:layout_constraintEnd_toStartOf="@id/img_see"

        android:layout_width="wrap_content"

        android:layout_height="wrap_content" />


    <ImageView

        android:id="@+id/img_see4"

        android:layout_width="@dimen/_15sdp"

        android:layout_height="@dimen/_17sdp"

        android:src="@drawable/more_small"

        android:layout_marginTop="@dimen/_5sdp"

        app:layout_constraintEnd_toEndOf="parent"

        app:layout_constraintTop_toBottomOf="@id/img_see3" />


    <TextView

        android:id="@+id/tv_colour"

        android:text="Colour"

        android:textSize="@dimen/_15ssp"

        app:layout_constraintStart_toStartOf="parent"

        app:layout_constraintTop_toBottomOf="@id/tv_material"

        android:textColor="@color/singup"

        android:layout_width="wrap_content"

        android:layout_height="wrap_content" />


    <ImageView

        android:id="@+id/color_chane"

        android:text="Brand New"

        android:src="@drawable/colors"

        android:textSize="@dimen/_14ssp"

        android:layout_marginTop="@dimen/_3sdp"

        android:textColor="@color/singup_opicity"

        app:layout_constraintTop_toBottomOf="@id/material_chane"

        android:layout_marginEnd="@dimen/_5sdp"

        app:layout_constraintEnd_toStartOf="@id/img_see"

        android:layout_width="wrap_content"

        android:layout_height="wrap_content" />


    <ImageView

        android:id="@+id/img_see5"

        android:layout_width="@dimen/_15sdp"

        android:layout_height="@dimen/_17sdp"

        android:src="@drawable/more_small"

        android:layout_marginTop="@dimen/_5sdp"

        app:layout_constraintEnd_toEndOf="parent"

        app:layout_constraintTop_toBottomOf="@id/img_see4"

        app:layout_constraintStart_toEndOf="@id/color_chane"/>


    <TextView

        android:id="@+id/tv_brand"

        android:text="Brand"

        android:textSize="@dimen/_15ssp"

        app:layout_constraintStart_toStartOf="parent"

        app:layout_constraintTop_toBottomOf="@id/tv_colour"

        android:textColor="@color/singup"

        android:layout_width="wrap_content"

        android:layout_height="wrap_content" />


    <TextView
        android:id="@+id/brand_chane"
        android:text="All Brands"
        android:textSize="@dimen/_14ssp"
        android:layout_marginTop="@dimen/_3sdp"
        android:textColor="@color/singup_opicity"
        app:layout_constraintTop_toBottomOf="@id/color_chane"
        android:layout_marginEnd="@dimen/_5sdp"
        app:layout_constraintEnd_toStartOf="@id/img_see"
        android:layout_width="wrap_content"
        android:layout_height="wrap_content" />

    <ImageView
        android:id="@+id/img_see6"
        android:layout_width="@dimen/_15sdp"
        android:layout_height="@dimen/_17sdp"
        android:src="@drawable/more_small"
        android:layout_marginTop="@dimen/_5sdp"
        app:layout_constraintEnd_toEndOf="parent"
        app:layout_constraintStart_toEndOf="@id/brand_chane"
        app:layout_constraintTop_toBottomOf="@id/img_see5" />


    <TextView
        android:id="@+id/tv_size"
        android:text="Size"
        android:textSize="@dimen/_15ssp"
        android:layout_marginTop="@dimen/_3sdp"
        app:layout_constraintStart_toStartOf="parent"
        app:layout_constraintTop_toBottomOf="@id/tv_brand"
        android:textColor="@color/singup"
        android:layout_width="wrap_content"
        android:layout_height="wrap_content" />

    <TextView
        android:id="@+id/size_chane"
        android:text="Large"
        android:textSize="@dimen/_14ssp"
        android:layout_marginTop="@dimen/_3sdp"
        android:textColor="@color/singup_opicity"
        app:layout_constraintTop_toBottomOf="@id/brand_chane"
        android:layout_marginEnd="@dimen/_5sdp"
        app:layout_constraintEnd_toStartOf="@id/img_see"
        android:layout_width="wrap_content"
        android:layout_height="wrap_content" />

    <ImageView
        android:id="@+id/img_see7"
        android:layout_width="@dimen/_15sdp"
        android:layout_height="@dimen/_17sdp"
        android:src="@drawable/more_small"
        android:layout_marginTop="@dimen/_5sdp"
        app:layout_constraintEnd_toEndOf="parent"
        app:layout_constraintStart_toEndOf="@id/brand_chane"
        app:layout_constraintTop_toBottomOf="@id/img_see6" />

    <TextView
        android:id="@+id/tv_price"
        android:text="Price Range"
        android:textSize="@dimen/_15ssp"
        android:layout_marginTop="@dimen/_3sdp"
        app:layout_constraintStart_toStartOf="parent"
        app:layout_constraintTop_toBottomOf="@id/tv_size"
        android:textColor="@color/singup"
        android:layout_width="wrap_content"
        android:layout_height="wrap_content" />

    <TextView
        android:id="@+id/price_chane"
        android:text="0 - 30$"
        android:textSize="@dimen/_14ssp"
        android:layout_marginTop="@dimen/_3sdp"
        android:textColor="@color/singup_opicity"
        app:layout_constraintTop_toBottomOf="@id/size_chane"
        android:layout_marginEnd="@dimen/_5sdp"
        app:layout_constraintEnd_toStartOf="@id/img_see"
        android:layout_width="wrap_content"
        android:layout_height="wrap_content" />

    <ImageView

        android:id="@+id/img_see8"
        android:layout_width="@dimen/_15sdp"
        android:layout_height="@dimen/_17sdp"
        android:src="@drawable/more_small"
        android:layout_marginTop="@dimen/_5sdp"
        app:layout_constraintEnd_toEndOf="parent"
        app:layout_constraintStart_toEndOf="@id/brand_chane"
        app:layout_constraintTop_toBottomOf="@id/img_see7" />
    </androidx.constraintlayout.widget.ConstraintLayout>

</androidx.cardview.widget.CardView>
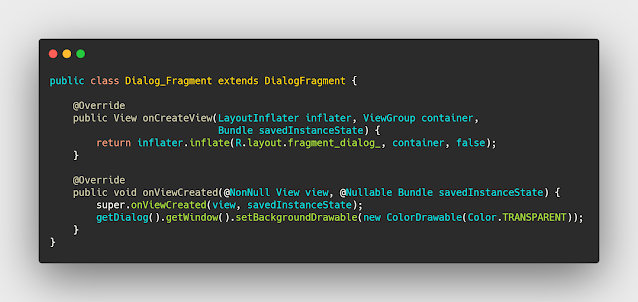
تحويل Fragment الى Dialog
في هذة الخطوة سوف نقوم بتحويل الفراجنت الى DialogFragment عن طريق extends لتخبره ان هذة الصفحه لا نريدها فراجمنت بل نريدها دايلوج او مربع حواري وفقط هذا ما يتم واكتب بداخلها الامر getDialog والتكمله الخاصه به وهي تظهر في الmethode رقم 2 من هذا الكود .
كود تحويل الفراجمنت الى دايلوج
public class Dialog_Fragment extends DialogFragment {

    @Override
    public View onCreateView(LayoutInflater inflater, ViewGroup container,
                             Bundle savedInstanceState) {
        return inflater.inflate(R.layout.fragment_dialog_, container, false);
    }

    @Override
    public void onViewCreated(@NonNull View view, @Nullable Bundle savedInstanceState) {
        super.onViewCreated(view, savedInstanceState);
        getDialog().getWindow().setBackgroundDrawable(new ColorDrawable(Color.TRANSPARENT));

    }
}
استدعاء dialog fragment في activity او fragment
بعد الانتهاء من جميع الخطوات السابقة ناتي الى اخر خطوة وهي استدعاء الفراجمنت في مكان اخر وذلك يتم عن طريق الانتقال الى المكان الذي تريد الاستدعاء فيه وتقوم بعد ذلك بعمل getSupportFragmentManager ليتم اضافة الفراجمنت الجديده وتقوم بعمل add وتضع بداخله الكلاس الذي يحمل الفراجمنت وتضع له tag او اسم وبعدها قم بتشغيل التطبيق وشاهد النتيجة
استدعاء dialog fragment في الاندرويد ستوديو
binding.filter.setOnClickListener(new View.OnClickListener() {

@Override
public void onClick(View v) {
getSupportFragmentManager().beginTransaction().add(new Dialog_Fragment(), "dialog").commit();

}
 });
- منع تدوير الهاتف اثناء استخدام تطبيقك في اندرويد ستوديو
- شرح كيفية اضافة صندوق اختيار الدولة في تطبيقك في برنامج اندرويد ستوديو
- انشاء تطبيق note باستخدام room & rx java ( تطبيقات اندرويد ستوديو مفتوحة المصدر )
- اكواد اندرويد ستوديو تقوم بعمل broadcast receiver لعرض نسبة شحن الهاتف
- شرح انشاء AnimatedBottomBar في نهاية التطبيق بواسطة برنامج اندرويد ستوديو
- كيفية رفع مجموعة صور svg مره واحده في android studio


